
In This Article
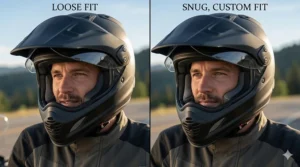
You know that feeling when your helmet starts pressing against your cheeks after just twenty minutes on the road? That nagging discomfort that makes you want to rip the thing off at every stoplight? I’ve been there, and honestly, it’s one of those problems you don’t realize you can actually fix until you discover custom fit cheek pads.
Here’s the thing most riders don’t know: your helmet’s original padding isn’t meant to last forever, nor is it designed to accommodate every head shape perfectly. Whether you’re dealing with worn-out foam that’s compressed into pancake-thin uselessness or you simply have a head shape that doesn’t match the manufacturer’s mold, custom fit cheek pads offer a surprisingly simple solution to what feels like an unsolvable problem.
The beauty of aftermarket replacement padding lies in its versatility. Think of it as tailoring for your helmet—you wouldn’t wear an off-the-rack suit to your wedding without alterations, right? Same principle applies here. Research from biomedical engineering studies shows that proper helmet fit significantly reduces head injury risk, making this not just about comfort but genuine safety enhancement.
What really changed the game for me was understanding that comfort upgrade padding isn’t just about making your ride more pleasant (though that’s definitely a perk). It’s about maintaining the protective integrity of your helmet while ensuring it stays exactly where it should be during both regular riding and, heaven forbid, an impact. When your helmet shifts around because the padding doesn’t fit right, you’re compromising the very protection you bought it for in the first place.
In this guide, I’ll walk you through the seven best options available right now, explain what makes memory foam cheek pads superior to traditional materials, and help you figure out exactly which thickness and density you need. Whether you’re looking for an OEM replacement liner or a complete helmet comfort improvement, you’ll find everything you need to make an informed decision.
Quick Comparison: Top Custom Fit Cheek Pads at a Glance
| Product | Best For | Thickness Options | Material | Price Range |
|---|---|---|---|---|
| Shoei VFX-EVO Cheek Pad Set | Universal fit across all helmet sizes | Multiple mm options | High-density foam | $40-$55 |
| Bell Qualifier DLX Cheek Pads | Budget-conscious riders | 30mm standard | Dual-density foam | $25-$35 |
| ScorpionEXO R420 KwikWick Pads | Moisture management | Large (varies) | 3D sculpted foam | $35-$45 |
| HJC i10 Cheek Pad Set | Mid-range comfort | 30mm | Standard padding | $30-$40 |
| NEXX X.WED 2 Cheek Pads | Adventure riders | Multiple sizes | Hypoallergenic foam | $65-$75 |
| Scorpion R1 Air Cheek Pads | Eyeglass wearers | Large | KwikFit 3D contoured | $40-$50 |
| AGV X3000 Cheek Pads | Classic helmet owners | Multiple sizes | Premium foam | $45-$60 |
💬 Just one click – help others make better buying decisions too! 😊
Top 7 Custom Fit Cheek Pads: Expert Analysis
1. Shoei VFX-EVO Cheek Pad Set – Premium Universal Performance
The Shoei VFX-EVO Cheek Pad Set stands out as one of the most versatile replacement padding options available today. What makes these pads exceptional is their universal interchangeability across all Shoei VFX-EVO helmet sizes—a feature that’s surprisingly rare in the market.
Key Specifications:
- Thickness measured in millimeters (printed on pad)
- Universal fit design
- DOT FMVSS 218 certified materials
The brilliance of Shoei’s design philosophy here is the thickness identification system. Each pad set has the thickness stamped right on it, making it incredibly easy to fine-tune your fit. Need a slightly tighter feel? Go thicker. Helmet feeling too snug after the pads break in? Drop down a size. This adjustable thickness liner approach gives you control over your helmet’s fit profile in a way most OEM replacement liners simply don’t offer.
Pros:
✅ Universal sizing eliminates guesswork
✅ Multiple thickness options for perfect customization
✅ Premium materials maintain shape over time
Cons:
❌ Premium price point
❌ Limited to Shoei VFX-EVO models only
Customer feedback consistently highlights the dramatic improvement in comfort after switching to fresh pads, with many riders noting they’d been suffering with compressed originals for far too long.
Price Range: $40-$55
2. Bell Qualifier DLX Cheek Pads – Best Budget-Friendly Option
The Bell Qualifier DLX Cheek Pads prove you don’t need to break the bank for significant helmet comfort improvement. These grey 30mm pads offer excellent value for riders looking to refresh their Bell Qualifier or Qualifier DLX helmets without spending premium dollars.
Key Specifications:
- Standard 30mm thickness
- Grey colorway matches most interiors
- Compatible with Bell Qualifier and DLX models
What I appreciate about Bell’s approach is their no-nonsense design. These are straightforward comfort upgrade padding solutions that do exactly what they’re supposed to do: cushion your face comfortably and maintain helmet stability. The dual-density foam construction provides both immediate softness against your skin and structural support where it counts.
Pros:
✅ Exceptional value for money
✅ Easy installation process
✅ Widely available and in-stock
Cons:
❌ Limited thickness options
❌ Single colorway may not match all interiors
Bell has sold thousands of these pads, and the consensus is clear: they’re a solid, reliable choice for riders who need fresh padding without fancy features or premium pricing.
Price Range: $25-$35
3. ScorpionEXO R420 Helmet Replacement Comfort KwikWick Cheek Pad Kit – Superior Moisture Management
The ScorpionEXO R420 Helmet Replacement Comfort KwikWick Cheek Pad Kit takes a different approach to the comfort problem by addressing moisture management head-on. If you ride in hot weather or tend to sweat more during longer rides, these pads deserve serious consideration.
Key Specifications:
- KwikWick moisture-wicking technology
- 3D sculpted design accommodates eyeglasses
- DOT FMVSS No. 218 Certified
- Available in Large size
The KwikWick fabric is the star here—it actively pulls moisture away from your skin, keeping your face drier and more comfortable even during extended summer rides. The 3D sculpted cheek pads are particularly clever, creating channels that allow most eyeglasses to fit without uncomfortable pressure points.
Pros:
✅ Excellent moisture management
✅ Eyeglass-friendly design
✅ Emergency release feature for EMT access
Cons:
❌ Limited size options
❌ Specific to R420 model only
Riders who’ve made the switch from standard padding to these hypoallergenic helmet liner options report dramatically reduced fogging issues and less face fatigue on long rides.
Price Range: $35-$45
4. HJC i10 Helmet Cheek Pad Set – Reliable Mid-Range Choice
The HJC i10 Helmet Cheek Pad Set represents what I’d call the “Goldilocks zone” of custom fit cheek pads—not too expensive, not too cheap, and with features that hit all the right notes for most riders.
Key Specifications:
- 30mm standard thickness
- Black colorway
- Fits Medium and XL i10 helmets
- DOT approved materials
HJC has been in the helmet game long enough to understand what riders actually need versus what sounds good in marketing copy. These pads deliver consistent comfort without gimmicks, using proven foam formulations that balance initial softness with long-term shape retention.
Pros:
✅ Perfect price-to-performance ratio
✅ Proven reliability across thousands of users
✅ Easy to source replacements
Cons:
❌ Limited to specific helmet sizes
❌ Standard features without advanced tech
With a 5-star rating from users who’ve actually purchased them, these pads have earned their reputation through consistent performance rather than flashy features.
Price Range: $30-$40
5. NEXX X.WED 2 Helmet Replacement Cheek Pads – Adventure Rider’s Choice
The NEXX X.WED 2 Helmet Replacement Cheek Pads cater specifically to adventure and dual-sport riders who need padding that can handle both highway cruising and off-road punishment. These represent a significant upgrade over stock pads for riders serious about comfort during all-day adventures.
Key Specifications:
- Available in sizes from XS through 3XL
- Hypoallergenic materials
- Compatible with X.WED and X.WED 2 models
- Premium construction quality
What sets NEXX apart is their attention to the unique demands of adventure riding. These pads need to stay comfortable whether you’re doing highway miles or bouncing through technical terrain, and the memory foam cheek pads construction delivers exactly that versatility.
Pros:
✅ Extensive size range for perfect fit
✅ Hypoallergenic materials reduce skin irritation
✅ Excellent durability in varied conditions
Cons:
❌ Premium pricing
❌ Limited helmet compatibility
Adventure riders consistently praise these pads for maintaining comfort even during multi-hour off-road sessions, which is perhaps the ultimate test of padding quality.
Price Range: $65-$75
6. Scorpion R1 Air Cheek Pads – Technology Meets Comfort
The Scorpion R1 Air Cheek Pads showcase Scorpion’s commitment to blending advanced materials with practical rider benefits. Specifically designed for the EXO-R1 Air Helmet, these pads incorporate multiple technologies that address common comfort complaints.
Key Specifications:
- KwikFit 3D contoured design
- EMT-friendly emergency release system
- Available in Large size
- Eyeglass-compatible construction
The KwikFit technology isn’t just marketing speak—it genuinely makes these pads adapt better to different face shapes while maintaining the structural support needed for safety. The 3D contouring creates space for eyeglass temples without creating pressure points, something anyone who’s tried wearing glasses under a helmet will immediately appreciate.
Pros:
✅ Advanced 3D contouring technology
✅ Emergency release system for safety
✅ Excellent eyeglass accommodation
Cons:
❌ Limited to R1 Air models
❌ Single size option may not suit all
The emergency release feature particularly impresses me—in the unlikely event of a serious accident, EMTs can quickly remove these pads to safely take off your helmet without excessive movement.
Price Range: $40-$50
7. AGV X3000 Cheek Pads – Classic Helmet Perfection
The AGV X3000 Cheek Pads serve a specific niche: riders who appreciate classic helmet aesthetics but refuse to compromise on modern comfort standards. These pads bring contemporary padding technology to AGV’s retro-styled X3000 helmets.
Key Specifications:
- Available in multiple sizes (XS through XL)
- Black colorway maintains classic aesthetic
- Premium foam construction
- Designed specifically for X3000 models
AGV understands that riders choosing the X3000 value both style and substance. These pads deliver plush comfort without the bulk that can ruin the classic helmet’s clean lines. The foam formulation strikes an excellent balance between softness and support—crucial for riders who might wear these helmets for hours during weekend rides.
Pros:
✅ Perfect for classic helmet styling
✅ Wide size range available
✅ Premium materials and construction
Cons:
❌ Higher price point
❌ Limited to X3000 compatibility
Riders transitioning from vintage helmets with minimal padding to the X3000 with these upgraded pads consistently report it’s like discovering comfort they never knew was possible in a classic-styled helmet.
Price Range: $45-$60
✨ Don’t Miss These Exclusive Deals!
🔍 Take your helmet comfort to the next level with these carefully selected products. Click on any highlighted item to check current pricing and availability. These upgrades will help you create authentic riding experiences your whole crew will appreciate!
Understanding Helmet Safety Standards: Why Padding Matters
Before we dive deeper into replacement padding options, you need to understand how your cheek pads fit into the larger picture of helmet safety. The Snell Memorial Foundation, established in 1957 after race car driver Pete Snell’s fatal crash, sets voluntary standards that significantly exceed government requirements.
When you replace your cheek pads, you’re not just swapping out foam—you’re maintaining a critical component of your helmet’s safety system. According to the National Highway Traffic Safety Administration, a properly fitting helmet is essential for maximum protection. Here’s why this matters more than most riders realize.
The Role of Cheek Pads in Impact Protection
Your custom fit cheek pads serve three essential functions simultaneously:
Helmet Stability 🏍️
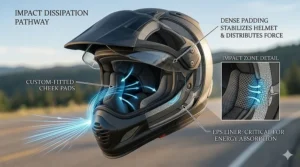
Properly fitted pads keep your helmet exactly where it needs to be. During an impact, even a few millimeters of helmet movement can mean the difference between the foam absorbing energy effectively and your head taking direct force. This isn’t theoretical—real-world crash data consistently shows that poorly fitted helmets provide measurably less protection.
Energy Absorption
The foam in your cheek pads contributes to the overall energy management system of your helmet. While the main EPS liner handles the bulk of impact forces, your cheek pads help distribute pressure evenly and prevent localized stress points that could compromise the protective structure.
Rotational Stability
Modern research increasingly focuses on rotational forces during crashes. Testing standards from organizations like DOT, Snell, and ECE now incorporate multiple impact angles and rotational force measurements. Your cheek pads help minimize helmet rotation during angled impacts, which is crucial for preventing traumatic brain injuries.
DOT vs. Snell vs. ECE: What It Means for Your Padding
Understanding these safety standards helps you make informed decisions about replacement pads:
The DOT (Department of Transportation) sets the minimum legal standard for helmets sold in the United States. When you see padding marked as “DOT FMVSS 218 certified,” it means the materials meet baseline requirements for density and compression characteristics.
Snell certification goes further, requiring more rigorous testing across multiple impact scenarios. Pads used in Snell-certified helmets typically employ higher-grade foam formulations with specific density requirements that maintain protective properties longer than minimum-standard materials.
ECE (Economic Commission for Europe) standards take yet another approach, emphasizing comprehensive testing that includes face shield integrity and abrasion resistance. While primarily focused on the helmet shell, ECE standards influence padding design by requiring specific retention system strengths.
The practical takeaway? When shopping for replacement padding, look for products explicitly designed for helmets meeting whichever standard your helmet carries. Mixing and matching random foam can compromise your helmet’s certified protection levels.
Memory Foam vs. Traditional Padding: What You Need to Know
The debate between memory foam cheek pads and traditional padding isn’t just about comfort—it’s about understanding the engineering trade-offs that affect both your riding experience and safety profile.
How Memory Foam Works
Memory foam, technically called viscoelastic polyurethane foam, responds to both heat and pressure. When you put on your helmet, your body heat and the pressure from your face cause the foam to soften and mold around your contours. Remove the helmet, and the foam slowly returns to its original shape.
This sounds perfect, right? And for many riders, it absolutely is. The custom-molding effect eliminates pressure points that traditional foam creates, especially for riders whose face shapes don’t match the helmet manufacturer’s design templates. Academic research on helmet padding comfort demonstrates that proper padding material selection significantly impacts both thermal comfort and moisture management.
The Traditional Padding Advantage
Here’s where it gets interesting: traditional closed-cell foam actually offers some advantages that memory foam can’t match. Traditional foam maintains consistent compression resistance regardless of temperature. Whether you’re riding in Arizona summer heat or Colorado winter cold, traditional foam behaves predictably.
This consistency matters for safety. In an impact, you want foam that responds to force in a known, tested manner. Memory foam’s temperature sensitivity means it might behave differently in a 95-degree crash versus a 40-degree one. For this reason, most helmet safety testing uses traditional foam as the baseline.
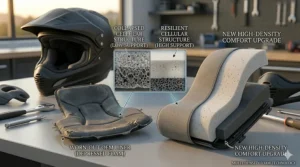
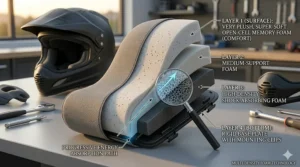
The Hybrid Solution
Smart manufacturers increasingly offer hybrid constructions: a memory foam comfort layer against your face, backed by traditional foam for structural support. This gives you the pressure-point elimination of memory foam while maintaining the predictable safety characteristics of traditional materials. If you’re upgrading to aftermarket pads, these hybrid options represent the best of both worlds.

How to Choose the Right Thickness and Density
Selecting the correct adjustable thickness liner specifications requires understanding how foam properties interact with your specific head shape and helmet model. Here’s my systematic approach to getting it right the first time.
Measuring Your Current Setup
Start by assessing your current situation. Put on your helmet and note how it fits:
Too Loose: If you can easily shift the helmet side-to-side or front-to-back with moderate hand pressure, you need thicker or denser pads.
Too Tight: If you get pressure points on your cheeks after 15-20 minutes, or if getting the helmet on requires significant effort, you need thinner or softer pads.
Compression Check: Press your fingers against your cheek pads while wearing the helmet. If they compress more than 25%, they’re likely worn out and need replacing regardless of thickness.
Understanding Foam Density
Foam density, measured in pounds per cubic foot (PCF) or kilograms per cubic meter, directly affects both comfort and durability:
Low Density (1-2 PCF):
Feels plush initially but compresses quickly. Fine for occasional riders but won’t last long under regular use. Think of this as “budget” foam that sacrifices longevity for initial softness.
Medium Density (2-4 PCF):
The sweet spot for most riders. Balances comfort with durability, typically lasting 2-3 years of regular riding. This is what you’ll find in most quality aftermarket pads.
High Density (4+ PCF):
Firm initially but breaks in beautifully. Takes longer to conform to your face but maintains that fit longer. Racing-oriented pads often use high-density foam because it provides more consistent performance over time.
The Break-In Factor
Here’s something manufacturers don’t emphasize enough: new pads always feel different—usually tighter—than worn-in ones. Quality foam needs 10-15 hours of wearing time to fully break in. What feels uncomfortably snug initially might become perfect after a few long rides.
My rule of thumb: if new pads feel moderately snug but not painful, give them a week of regular use before deciding to exchange them. If they’re creating genuine pressure points or headaches from the start, that’s different—size up immediately.
Seasonal Considerations
If you ride year-round, consider having two sets of pads: thicker for winter (when you might wear a balaclava) and thinner for summer (when you’re riding with just your face exposed). This might sound excessive, but the comfort difference is substantial, and having properly fitting seasonal padding extends the life of both sets.
Installation Guide: DIY Pad Replacement
Replacing your OEM replacement liner or upgrading to aftermarket pads isn’t rocket science, but there are tricks that make the process smoother and help ensure proper fitment. Here’s how to do it right.
Tools You’ll Need
Most helmet cheek pad replacements require minimal tools:
- Your new pads (obviously)
- A soft, clean workspace
- Optional: small flathead screwdriver for stubborn snaps
- Cleaning supplies for the helmet interior
Step-by-Step Installation Process
Step 1: Remove Old Pads
Most modern helmets use snap-button systems for cheek pad attachment. Locate the snaps—usually 2-4 per pad—and apply firm, even pressure to release them. Some manufacturers use Velcro systems instead, which simply pull away with steady force. If you encounter resistance, don’t force it; check your helmet’s manual for model-specific removal instructions.
Step 2: Clean the Helmet Interior
This is your opportunity to thoroughly clean the areas normally covered by pads. Use a mild soap solution and soft cloth to remove accumulated oils, sweat, and debris. Let everything dry completely before installing new pads—moisture trapped under fresh padding creates breeding grounds for bacteria and odors.
Step 3: Orient New Pads Correctly
Before installation, identify left and right pads (they’re usually marked). Notice the contour—the pads curve to match your face shape, and installing them backwards or swapped will create uncomfortable pressure points. Take a moment to compare the new pad’s snap positions with the helmet’s mounting points.
Step 4: Install New Pads
Start with one mounting point and work your way around. Press firmly until you hear or feel the snap click into place. Don’t assume it’s secure just because it looks attached—give each snap a gentle tug to verify it’s fully engaged. Partially seated snaps will pop loose during use, which is both annoying and potentially dangerous.
Step 5: Test Fit
Put the helmet on and assess the fit. Remember, new pads will feel different than broken-in ones. Check for even pressure distribution—you shouldn’t have specific pressure points that feel distinctly tighter than surrounding areas. Shake your head vigorously; the helmet should move with you as a unit rather than sliding around.
Common Installation Mistakes
Forcing Misaligned Snaps:
If a snap isn’t lining up easily, don’t force it. You’ll either damage the snap mechanism or deform the foam, neither of which improves your situation. Reorient the pad and try again.
Ignoring the Break-In Period:
I mentioned this earlier, but it bears repeating: new pads feel tighter. Resist the urge to immediately swap them out if they don’t feel exactly like your old, worn-in pads did. Give them time.
Skipping the Cleaning Step:
Installing fresh pads over a grimy interior is like putting new sheets on an unmade bed. The five minutes you invest in cleaning pays dividends in hygiene and pad longevity.
Maintenance Tips for Maximum Longevity
Quality custom fit cheek pads represent an investment in your riding comfort and safety. Proper maintenance extends their useful life significantly—here’s how to get the most out of your investment.
Regular Cleaning Routine
Sweat, oils, and environmental contaminants gradually break down foam structure. Establishing a cleaning routine prevents premature degradation:
After Every Ride (Quick Clean):
Use helmet deodorizing spray designed specifically for foam padding. These products neutralize odors without saturating the foam with moisture. A quick spray after each ride prevents bacteria buildup that causes both smell and material breakdown.
Monthly (Deep Clean):
Remove pads if possible and hand-wash with mild soap and lukewarm water. Avoid hot water, which can damage foam structure. Rinse thoroughly—soap residue attracts dirt and can irritate skin. Air dry completely before reinstalling; never use direct heat sources like hair dryers or radiators, which cause foam to become brittle.
Storage Considerations
How you store your helmet between rides affects pad longevity:
Store your helmet in a cool, dry place away from direct sunlight. UV exposure breaks down foam compounds, reducing both comfort and protective properties. Avoid hanging your helmet by the chin strap, which can distort pad shape over time. Instead, place it upside down on a soft surface or use a proper helmet stand.
If you won’t be riding for an extended period, consider removing the pads and storing them separately in a breathable bag. This prevents compression-set (permanent deformation from prolonged pressure) and allows better air circulation.
When to Replace
Even with excellent maintenance, helmet comfort improvement pads don’t last forever. Replace them when you notice:
Visible Foam Degradation:
Crumbling, cracking, or separation of layers indicates the foam has reached the end of its useful life.
Permanent Compression:
If pads no longer spring back to their original thickness after being worn, they’ve lost their supportive properties.
Odor Persistence:
If cleaning no longer eliminates odors, bacteria has penetrated deep into the foam structure. Time for fresh pads.
Loss of Grip:
If your helmet moves around more than it used to despite proper chin strap tension, the pads have compressed beyond their effective range.
Most riders should plan on replacing pads every 18-24 months with regular use. If you ride daily in hot weather, that timeline shortens to 12-15 months. Weekend warriors might stretch it to 3 years, but don’t push it beyond that.
✨ Transform Your Riding Experience Today!
🏍️ Ready to say goodbye to helmet discomfort forever? These custom fit solutions deliver professional-grade comfort at prices that make sense. Click through to discover your perfect match and join thousands of riders who’ve already made the switch!
Brand-Specific Considerations: Finding Your Perfect Match
Not all custom fit cheek pads play equally well with every helmet brand. Understanding manufacturer-specific design philosophies helps you select pads that integrate seamlessly with your helmet’s overall construction.
Shoei Philosophy: Precision Engineering
Shoei takes helmet fit seriously enough to offer the widest range of cheek pad thickness options. Their millimeter-based sizing system allows incredibly granular fit adjustments. When selecting Shoei pads, start with the thickness that came with your helmet and adjust from there based on your experience. Many Shoei riders find that moving one thickness increment (usually 2mm) makes a substantial difference.
HJC Approach: Value and Reliability
HJC focuses on delivering consistent, reliable padding across their extensive helmet lineup. While they offer fewer customization options than premium brands, their standard pads work well for average head shapes. HJC pads tend to be slightly softer than equivalent Shoei or Arai options, which some riders prefer for immediate comfort, though they may compress faster over time.
Bell’s User-Friendly Design
Bell engineers their padding systems for easy DIY replacement, with snap mechanisms that are genuinely foolproof. This accessibility makes Bell an excellent choice if you’re new to pad replacement or want the option to easily swap between different thickness options for different riding conditions.
Scorpion’s Tech Integration
Scorpion differentiates through material technology—their KwikWick and 3D contouring represent genuine functional improvements over basic foam. If moisture management and eyeglass accommodation are priorities, Scorpion’s higher price point delivers measurable value.
Solving Common Helmet Fit Problems
Even with quality custom fit cheek pads, you might encounter specific fit issues. Here’s how to diagnose and solve the most common problems:
Problem: Pressure Points on Cheekbones
Diagnosis: Your helmet’s internal shape doesn’t match your face structure, creating concentrated pressure rather than even distribution.
Solution: Look for pads with 3D contouring or consider stepping up to thicker pads that provide more surface area for pressure distribution. Alternatively, thinner pads might allow the helmet shell itself to sit differently on your head, eliminating the pressure point.
Problem: Helmet Shifts During Riding
Diagnosis: Insufficient contact between pads and face, often due to worn-out compression or pads too thin for your head shape.
Solution: Move up in pad thickness or density. Your helmet should require moderate effort to put on—if it slides on easily, it will slide around during riding.
Problem: Numbness or Tingling After Long Rides
Diagnosis: Excessive pressure restricting blood flow, usually from pads that are too thick or dense for your face structure.
Solution: Reduce pad thickness or switch to softer foam formulations. Remember that new pads feel tighter initially—if this problem appears immediately after installation, wait through the break-in period before downsizing.
Problem: Gaps Between Pad and Face
Diagnosis: Your face shape creates natural hollows that standard pad contours don’t fill.
Solution: Memory foam pads excel at filling irregular contours. Alternatively, consider hybrid pads with multiple foam layers that better conform to complex face shapes.
Frequently Asked Questions
❓ How often should I replace my helmet cheek pads?
❓ Can I mix different thickness pads on left and right sides?
❓ Will aftermarket pads affect my helmet's safety certification?
❓ What's the difference between OEM and aftermarket replacement padding?
❓ How do I know which thickness to choose if this is my first time?
Conclusion: Invest in Comfort, Invest in Safety
After riding for years with suboptimal helmet fit, discovering properly customized cheek pads genuinely changed my relationship with longer rides. What used to feel like endurance tests—fighting discomfort and distraction—transformed into the pure enjoyment riding should be.
The seven products I’ve covered here represent the best options available right now for riders seeking genuine helmet comfort improvement without compromising safety. Whether you choose the budget-friendly Bell Qualifier DLX Cheek Pads for straightforward comfort or invest in premium NEXX X.WED 2 Cheek Pads for advanced materials, you’re making a decision that affects every moment you spend wearing your helmet.
Remember that custom fit cheek pads aren’t just about comfort—they’re about maintaining the protective integrity your helmet was designed to provide. Research from biomedical engineering studies confirms that worn-out or ill-fitting pads compromise both safety and enjoyment, making replacement one of the most cost-effective upgrades you can make to your riding experience.
Take the time to measure correctly, understand your specific fit needs, and don’t hesitate to experiment with different thickness options. The perfect fit exists for your face shape—it just might take trying a couple of options to find it. And when you do? You’ll wonder why you waited so long.
Recommended for You
- 7 Best Evaporative Cooling Skull Cap Reviews – 2026
- 7 Best Pinlock Anti-Fog Systems 2026: Rider’s Ultimate Guide
- 7 Best Photochromic Helmet Visor Options for 2026
Disclaimer: This article contains affiliate links. If you purchase products through these links, we may earn a small commission at no additional cost to you.
✨ Found this helpful? Share it with your riding friends! 💬🤗